I don’t think we see not enough Chatons on nails, don’t you agree? I don’t know if it has to do with the fact that you think it sticks out too much on the nail, if you don’t know how to attach them so that it lasts, or if we simply haven’t seen enough pictures to get used to the thought of wearing it. The is actually something that really works If we see something enough that we thought seemed strange at first, we will then think it is quite “normal”, because we simply got used to seeing it. That’s exactly how it was when tapered nails started to spread in the nail industry, now it’s one of the most popular shapes! So I’ll just take charge and show you some Chatons and explain how to attach them.

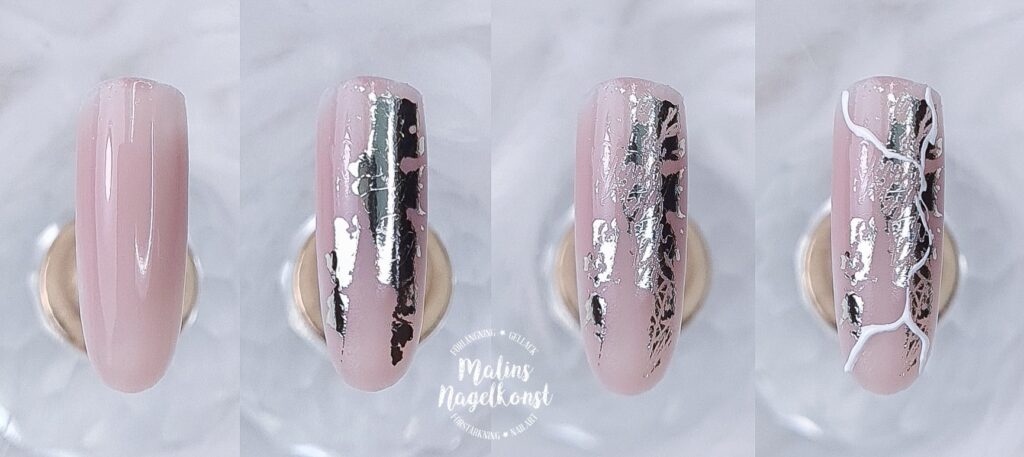
Step 1: Paint the nail in a nice nude.
Step 2: Dab on foil.
Step 3: Scrape the foil a little to make it a little more “alive”. I used the narrow side of my cuticle pusher.
Step 4: Paint white lines with the Swirly brush along the nail. They should be a little uneven and shaky. Sometimes it is almost best to use your non-dominant hand for this step.

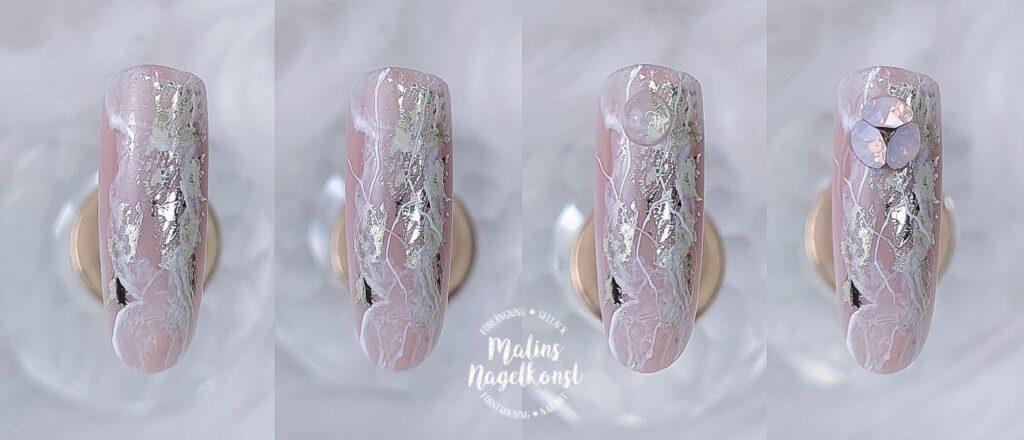
Step 5: Wet the Block brush in a small amount of cleanser and gently smear the white out.
Step 6: Paint super-thin uneven lines with the Stripy brush. The same applies here as for step 4. They should be a little shaky painted, a little here and there. Don’t think, just do!
Step 7: Place a ball of gel in higher viscosity where you want your chatons to be. A good rule of thumb is that the ball should be the same size as one of the chatons.
Step 8: Place your chatons in a cluster of three with your pickup tool. You can move them around for a while before they sit together as they should. If you notice that you have applied too much gel, just drag some of it off with a narrow brush. If you haven’t used enough, you simply add a little more gel. You can do this with in rounds and cure in-between. Also make sure to turn the nail around a little during curing to help the light reach everywhere. Because the gel cures in a chain, it will be fully cured.
Step 9: Top coat the entire nail. The top coat should touch all the edges of the crystals, but don’t put any on top of them.
All done!! Pretty, right? More chatons to the people! Before top coating, it is also very pretty to continue decorating with crystals, pixies and caviar beads, go crazy and see what happens! And to get you started, we would like to offer you a discount code so that you’ll get 10% off all Chatons in the shop! Valid until Wednesday September 16. Enter “MalinChatons” at checkout and happy shopping!
Take care of each other and talk to you soon!
/ Malin Schlott – @malinsnagelkonst

PRODUCTS USED IN THIS POST:
| Cookie | Duration | Description |
|---|---|---|
| cookielawinfo-checkbox-analytics | 11 months | This cookie is set by GDPR Cookie Consent plugin. The cookie is used to store the user consent for the cookies in the category "Analytics". |
| cookielawinfo-checkbox-functional | 11 months | The cookie is set by GDPR cookie consent to record the user consent for the cookies in the category "Functional". |
| cookielawinfo-checkbox-necessary | 11 months | This cookie is set by GDPR Cookie Consent plugin. The cookies is used to store the user consent for the cookies in the category "Necessary". |
| cookielawinfo-checkbox-others | 11 months | This cookie is set by GDPR Cookie Consent plugin. The cookie is used to store the user consent for the cookies in the category "Other. |
| cookielawinfo-checkbox-performance | 11 months | This cookie is set by GDPR Cookie Consent plugin. The cookie is used to store the user consent for the cookies in the category "Performance". |
| viewed_cookie_policy | 11 months | The cookie is set by the GDPR Cookie Consent plugin and is used to store whether or not user has consented to the use of cookies. It does not store any personal data. |